You've got a great design. You've got a quality DTF transfer. You've got your heat press ready to go. Now comes the question that trips up more beginners than any other: where exactly do I put this thing?
Transfer placement matters more than most people realize. A logo that's too high looks awkward. A design that's off-center looks amateur. Get it right, and your finished product looks like it came from a professional print shop because it did.
This guide gives you the exact measurements and positioning standards used by professional custom apparel printers. Save it, print it, bookmark it you'll use it constantly.
Why Placement Matters
Before we get into the numbers, understand why consistent placement is so important:
Brand consistency: If you're selling custom apparel, every shirt in a run needs to look the same. Inconsistent placement is immediately obvious when garments are laid next to each other.
Professional appearance: Customers can tell when a print is slightly too high or off to one side, even if they can't articulate exactly what looks wrong. Correct placement just looks right.
Customer satisfaction: Nothing ruins a custom order faster than a design that's visibly crooked or in the wrong position. Get this right and you'll have happy, repeat customers.
Standard Placement Positions: The Complete Guide
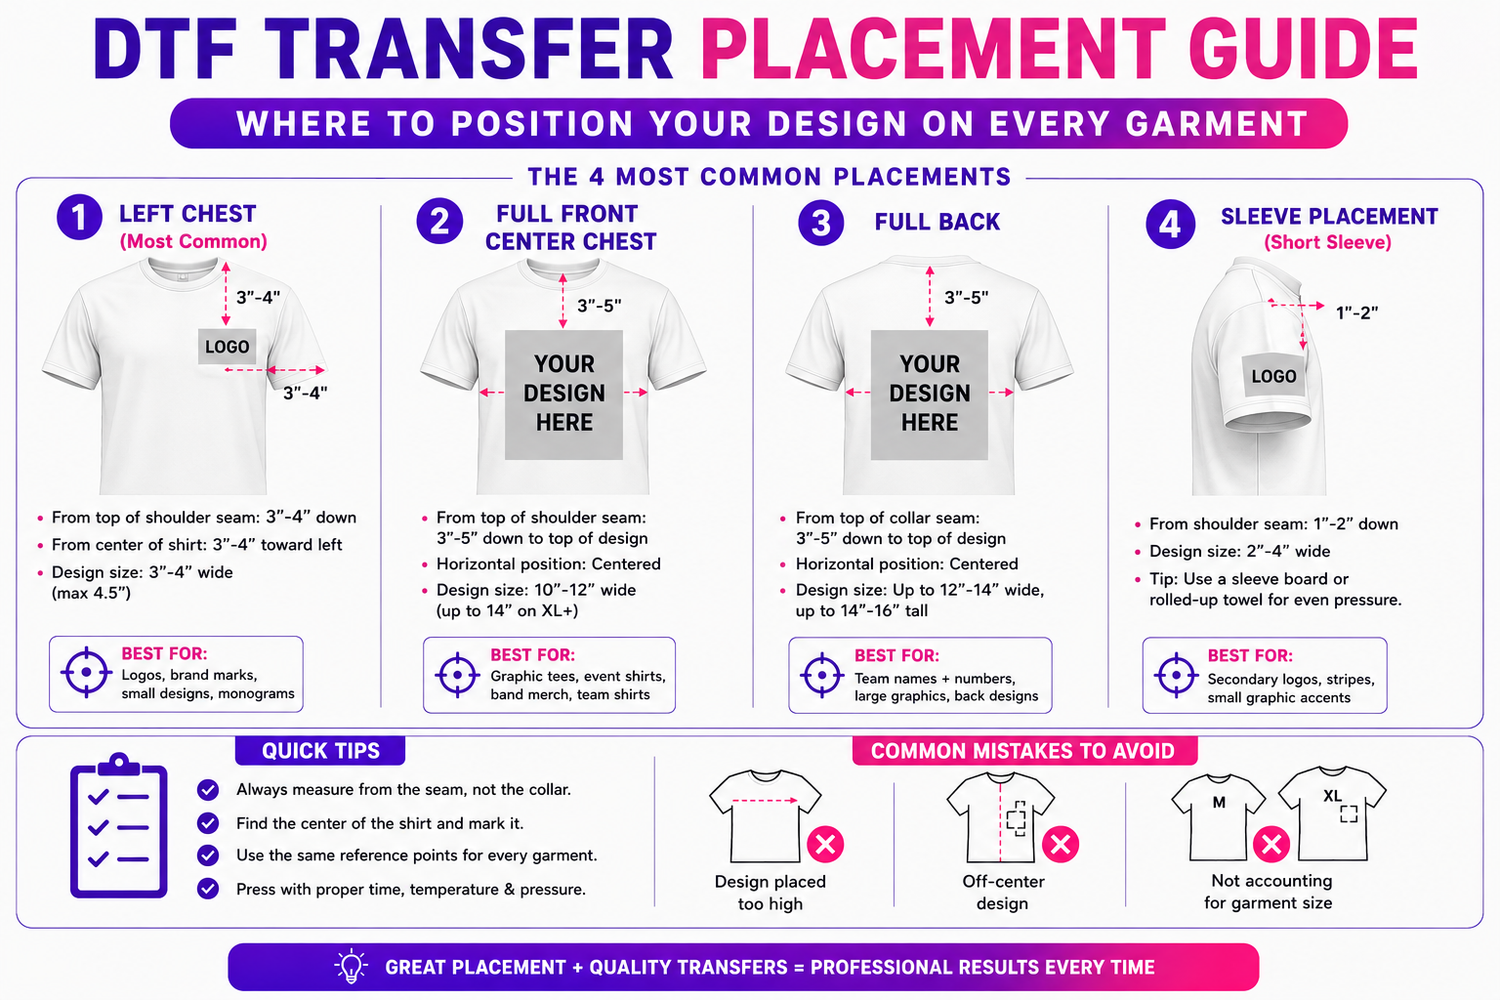
1. Left Chest (Most Common)
The left chest is the most popular placement for logos, small designs, and branding. Think of where a pocket would be on a dress shirt that's your target area.
Measurements:
- From top of shoulder seam: 3"–4" down
- From center of shirt: 3"–4" toward the left
- Design size: 3"–4" wide (maximum 4.5" for larger logos)
How to find it quickly: Place four fingers horizontally below the collar seam. That's your top edge. Then move your hand 3–4 inches toward the left that's your centre point.
Best for: Company logos, brand marks, small graphic elements, monograms
2. Full Front Center Chest
A bold, centered placement for larger designs. This is the standard for graphic tees, band shirts, event tees, and anything meant to make a statement.
Measurements:
- From top of shoulder seam: 3"–5" down to the top of the design
- Horizontal position: Perfectly centered on the shirt
- Design size: 10"–12" wide (can go up to 14" on XL+ sizes)
How to center it: Fold the shirt in half vertically and mark the center line with a chalk marker. Use a ruler to measure down from the collar.
Best for: Graphic tees, event shirts, band merch, team shirts, statement designs
3. Full Back
The back of the shirt is prime real estate for large designs, text, team names, player numbers, and detailed artwork.
Measurements:
- From top of collar seam: 3"–5" down to the top of the design
- Horizontal position: Centered
- Design size: Up to 12"–14" wide, up to 14"–16" tall
Note on back placement: The back of the shirt has more room to work with than the front, but don't push designs too low anything below the mid-back tends to get tucked into pants and looks odd on shorter garments.
Best for: Team names + numbers, large graphics, back-focused designs, lyrics/quotes
4. Sleeve Placement
Sleeve prints have blown up in popularity. They work great for subtle branding, secondary logos, or decorative elements.
Measurements for short sleeve (standard tee):
- From shoulder seam: 1"–2" down
- Design size: 2"–4" wide (keep it small sleeves don't have much real estate)
Measurements for long sleeve:
- Same starting position from shoulder seam
- Can run a design down the length of the sleeve (8"–12" for a sleeve stripe)
Tip: Use a sleeve board or rolled-up towel inside the sleeve when pressing to get even pressure without pressing through to the other side.
Best for: Secondary logos, stripes, small graphic accents
5. Pocket Area (Where a Pocket Would Be)
Similar to left chest but slightly smaller, designed to mimic the look of a pocket tee.
Measurements:
- From top of shoulder seam: 4"–5" down
- Design size: 3"–3.5" wide
- Position: Slightly left of center (left chest area)
Best for: Small logos, pocket-style graphics, minimalist branding
6. Nape of Neck (Inside Back Collar)
A trendy placement for branding, sizing info, or a secondary logo that peeks out when the collar folds down.
Measurements:
- From collar seam: 1"–1.5" down, centered
- Design size: 2"–3" wide
Important: Use lower temperature here (275–285°F) the collar area is often thicker and the seam can create uneven pressure. Press with firm, even pressure and check the edges carefully.
Best for: Brand labels, inside-collar branding, neck tags
7. Lower Front Hem
A modern, streetwear-inspired placement at the bottom front of the shirt.
Measurements:
- From bottom hem: 1.5"–3" up
- Position: Centered or slightly off-center (left or right)
- Design size: 3"–6" wide
Best for: Brand wordmarks, street-style logos, subtle secondary branding
Placement by Garment Type
Different garment types have different sweet spots. Here's a quick reference:
T-Shirts
Use the measurements above. The left chest and full front center are by far the most popular.
Hoodies
- Front: Same as t-shirt, but account for the kangaroo pocket, keep designs above the pocket or plan for the pocket to be part of the design
- Back: 4"–6" from collar (hoods add height, so go lower than you would on a t-shirt)
- Hood: Small design (2"–3") centered on the back of the hood
Hats (Caps)
- Front panel: Centered, 1"–2" up from the brim
- Design size: 2"–4" wide, 1.5"–2.5" tall
- Tip: Use a hat press or a curved/silicone pad to get even pressure on the curved surface
Tote Bags
- Front: Centered, 4"–6" from the top of the bag
- Design size: Up to 10"–12" wide depending on bag size
Onesies and Baby Apparel
- Chest: Centered, 1.5"–2.5" from the collar
- Design size: 4"–6" wide (scale down proportionally)
Tools That Make Placement Easier
You don't have to eyeball it every time. These tools save time and improve consistency:
T-Square Ruler / Placement Ruler: A long ruler with alignment markings specifically for garment placement. Many brands (like Heatmaster and HPN) make these specifically for heat pressing.
Laser Alignment Tool: Mounts on your heat press and projects a laser crosshair onto the garment. Expensive but incredibly fast for high-volume shops.
Chalk Markers: Temporary, heat-erasable markers for marking placement before pressing. Disappears with heat.
Alignment Tape: Low-tack tape that holds your transfer in position before pressing without leaving residue.
Platen Grid: Some heat presses come with a grid on the lower platen use this as a reference for centering.
Common Placement Mistakes (And How to Avoid Them)
Design placed too high: Always measure from the collar seam, not the collar itself. The seam is your consistent reference point.
Off-center design: Always find the center of the shirt first. Fold it in half, press lightly to create a crease, and use that as your guide.
Inconsistent placement across a run: Use a placement ruler and mark the same reference point on every garment before pressing. Don't rely on your eye alone.
Not accounting for garment size: A left chest logo that looks perfect on a medium will be in the wrong position on an XS or an XXL if you don't adjust. Scale your placement with the size of the garment.
Ready to Press? We've Got Your Transfers.
Great placement starts with a great transfer. At Perfect DTF Transfers, we print every order right here in Broussard, Louisiana vibrant, full-color, ready-to-press transfers that look sharp no matter where you place them.
- Transfers from $0.53
- No minimums, no setup fees
- Same-day local pickup or next-day shipping
- 300 DPI precision printing for clean edges and crisp details
- Family-owned and operated, we care about your results
👉 Order at perfectdtftransfers.com and press with confidence.


Leave a comment
This site is protected by hCaptcha and the hCaptcha Privacy Policy and Terms of Service apply.